Last Updated: 2023-10-20 12:20:09 Friday
-- TOC --
本文总结find命令的使用方法,它用来在Linux命令行终端按各种规则搜索你需要的文件和目录,它很强大,但参数很复杂!
find - search for files in a directory hierarchy
find命令默认会把所有隐藏路径(.开头的目录)加入搜索范围。对于没有权限的路径,要加 sudo。不写路径就是当前路径,默认执行-print。find命令默认没有-L,do not follow link。
$ find [-H] [-L] [-P] [-D debugopts] [-Olevel] [starting-point...] [expression]
如果搜索路径是symlink,一定要记得带上-L,否则什么都找不到...比如:
$ find -L /lib64 ... # /lib64 is linked to /usr/lib64 in fedora
从当前路径开始,按文件名(basename),搜索config.ini这个文件:
$ find . -name config.ini
从根目录开始,按文件名,搜索所有后缀是.gz的文件。这里的 *.gz 是按glob方式匹配文件名:
$ find / -name '*.gz'
从 /tmp 路径开始,按文件名,不区分大小写,搜索所有名称中含有 init 的文件:
$ find /tmp -iname '*init*'
-name 要区分大小写;而 -iname 不区分大小写。
$ ll
total 40
drwxrwxr-x  2 xinlin xinlin  4096 11月 22 14:31 ./
drwxr-xr-x 18 xinlin xinlin  4096 11月 22 14:10 ../
-rwxrwxr-x  1 xinlin xinlin 16696 10月 22 11:28 a.out*
-rw-rw-r--  1 xinlin xinlin   308 10月 21 15:26 hello_driver.c
-rw-rw-r--  1 xinlin xinlin   131 10月 22 10:52 makefile
-rw-rw-r--  1 xinlin xinlin     0 11月 22 14:31 test.a
-rw-rw-r--  1 xinlin xinlin     0 11月 22 14:31 test.b
-rw-rw-r--  1 xinlin xinlin    85 10月 22 11:28 test.c
$ find . -name test.*
find: paths must precede expression: `test.b'
find: possible unquoted pattern after predicate `-name'?
$ find . -name 'test.*'
./test.a
./test.c
./test.b
给test.*加上单引号,就OK了,bash不再展开。出错是因为shell命令行展开了test.*:
$ find . -name test.a test.b test.c
find: paths must precede expression: `test.b'
find: possible unquoted pattern after predicate `-name'?
在find命令中使用wildcard时,加上引号应该是个好习惯! 关于glob规则
-name参数匹配basename,因此后面的pattern不能包含路径符号/;如果要带上路径符号搜索,请使用-path,无视大小写,用-ipath。(注意basename这个概念)
$ find . -path './a*/a*'
./ab/ab.txt
./aa/aa.txt
-lname和-ilname,用来查找symbolic link file,这个参数可以省略-type l:
$ find ../../usr/bin -lname ping
../../usr/bin/ping4
../../usr/bin/ping6
$ find ../../usr/bin -type l -name 'ping*'
../../usr/bin/ping4
../../usr/bin/ping6
-lname与-name,实现方式有差异,后面的pattern的写法有点不同。
一个值得注意的细节,是find命令打印出来的pathname,与命令行的路径参数是对应的,这决定了在使用-path的时候,后面的pattern应该怎么写:
$ find ../../usr/bin -path '../../*ping*'
../../usr/bin/ping
../../usr/bin/ping4
../../usr/bin/l2ping
../../usr/bin/ping6
从当前路径开始,按文件大小,搜索大小为1608bytes的文件:
$ find . -size 1608c
c,char,在find命令中用来表示字节,其它表达文件大小单位的符号如下(注意大小写):
bfor 512-byte blocks (this is the default if no suffix is used)
cfor bytes
wfor two-byte words
kfor kibibytes (KiB, units of 1024 bytes)
Mfor mebibytes (MiB, units of 1024 * 1024 = 1048576 bytes)
Gfor gibibytes (GiB, units of 1024 * 1024 * 1024 = 1073741824 bytes)
在实际使用 -size 来搜索文件的时候,很少会像刚才那个例子一样,明确指定出文件的具体大小,更多的时候,我们都是输入一个范围,比如大于多少,或者小于多少。
从当前路径开始,按文件大小,搜索大于208k的文件:
$ find . -size +208k
从 /home/pi 路径开始,按文件大小,搜索小于512bytes的文件:
$ find /home/pi -size -512c
在大小前面使用
+-符号,分别表示大于或小于这个size,没有等于!
从当前路径开始,按文件大小,搜索用5个512byte-block存放的文件(刚好5个block):
$ find . -size 5
512bytes是一个传统的存储器扇区的最小单位。不过我们一般在按size寻找文件的时候,不会使用block这种对人类不友好的单位。
Bear in mind that the size is rounded up to the next unit. Therefore -size -1M is not equivalent to -size -1048576c. The former only matches empty files, the latter matches files from 0 to 1,048,575 bytes.
-size -1M,只能匹配空文件,因为要round到M这个unit,-1M表示小于等于0M,就只有空文件匹配了。
与文件有关的时间,<a|m|c>time,这个时间一定是过去的时间,不会是未来的时间!
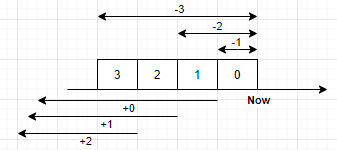
后面的描述,以mtime为例,参数都是24小时的倍数,这部分有点烧脑...
从当前路径开始,按修改时间,搜索距离现在不超过24小时修改过的文件:
$ find . -mtime 0
$ find . -mtime -1
从当前路径开始,按修改时间,搜索距离现在在24-48小时之间修改过的文件:
$ find . -mtime 1
从当前路径开始,按修改时间,搜索距离现在不超过48小时修改过的文件:
$ find . -mtime -2
-n表示过去nx24小时;n表示过去的第(n+1)个24小时内,从0开始,因为0表示还没有到一个完整的24小时,因此0表示距离现在过去的第1个24小时内。
从当前路径开始,按修改时间,搜索修改时间超过24小时的文件:
$ find . -mtime +0
从当前路径开始,按修改时间,搜索修改时间超过48小时的文件:
$ find . -mtime +1
+n表示除去距离现在(n+1)个24小时之外的时间,即非n所包括的时间段。
默认find使用-P,ever follow symbolic links. This is the default behaviour. 而当-L参数出现时,Follow symbolic links.
从 /home 开始,按类型,搜索所有目录:
$ find /home -type d
除了 d 表示 directory,目录,还有以下类型的type:
bblock (buffered) special
ccharacter (unbuffered) special
pnamed pipe (FIFO)
fregular file
lsymbolic link; this is never true if the-Loption or the -follow option is in effect, unless the symbolic link is broken. If you want to search for symbolic links when -L is in effect, use -xtype.
ssocket
同时查找多个类型。从当前路径开始,按类型,搜索所有符号链接和socket文件:
$ find . -type l,s
同时按名称和类型搜索:
$ find . -type d -name <name>
-xtype
The same as -type unless the file is a symbolic link. For symbolic links: if the -H or -P option was specified, true if the file is a link to a file of type c; if the -L option has been given, true if c is l. In other words, for symbolic links, -xtype checks the type of the file that -type does not check.
使用-xtype可以穿透符号链接文件到它指向的目标文件,检查目标文件的type。
$ find /usr/bin -type l | grep ping4
/usr/bin/ping4  # it is a symbolic link
$ find /usr/bin -xtype f | grep ping4
/usr/bin/ping4  # target is regular files
[小技巧] 查找所有的broken symbolic link:
$ sudo find . -xtype l
./ramdisk/lib/modules/5.4.51_tc/source
./ramdisk/lib/modules/5.4.51_tc/build
./test/qemu/2104_3rd/initrd_3rd/lib/modules/5.4.51_tc/source
./test/qemu/2104_3rd/initrd_3rd/lib/modules/5.4.51_tc/build
./.mozilla/firefox/ln7yyoom.default-release/lock
$ sudo find -L . -type l
./ramdisk/lib64/modules/5.4.51_tc/source
./ramdisk/lib64/modules/5.4.51_tc/build
./ramdisk/lib/modules/5.4.51_tc/source
./ramdisk/lib/modules/5.4.51_tc/build
./test/qemu/2104_3rd/initrd_3rd/lib64/modules/5.4.51_tc/source
./test/qemu/2104_3rd/initrd_3rd/lib64/modules/5.4.51_tc/build
./test/qemu/2104_3rd/initrd_3rd/lib/modules/5.4.51_tc/source
./test/qemu/2104_3rd/initrd_3rd/lib/modules/5.4.51_tc/build
./.mozilla/firefox/ln7yyoom.default-release/lock
用穿透symbolic link的方式查找,如果broken了,无法穿透,就还是symbolic link。第2种方式会把所有间接的broken link也找出来!
用这两种方式查找link file,结果可能不一样,请注意!
从当前路径开始,搜索size大于2K(>=3K)的普通文件:
$ find . -size +2k [-a|-and] -type f
-a表示 and,与关系。默认多条件的时候,就是and!
在 /usr 路径下,搜索文件名为cgi.sock,或者socket文件:
$ find /usr -name cgi.sock -o|-or -type s
-o表示或-or,或关系。
在当前路径下,搜索所有不是目录或普通文件的文件:
$ find . -not -type d,f
$ find . ! -type d,f
-not表示后 not,非关系,可以用!来表示。
$ find path1 path2 path3 ...
在find后面罗列要执行搜索的多个路径,后面是搜索条件。
如果多个路径有相互重叠的情况,find会在重叠的路径下,重新执行搜索!
$ find [path]
如果没有路径,默认为当前路径,.是可以省略的。显示先目录后文件,可用-depth将这个顺序颠倒。如下,搜索test目录,先显示文件,最后显示目录:
$ find test -depth
test/b.txt
test/a/kk
test/a
test
$ find test
test
test/b.txt
test/a
test/a/kk
find命令会默认做recursive搜索,因此
-depth不是用来表示搜索深度,而是表示先把深度显示出来。find命令的这种遍历功能,常常与cpio命令一起打包ramdisk。
-d与-depth一样!上
find命令默认使用 -print参数,表示每一个文件或目录显示出来后,后面跟一个newline。如果使用-print0参数,表示用 0x00 (null character)代替newline。
find命令默认当前路径和print!
$ find test -print0
testtest/b.txttest/atest/a/kkxinlin@K:~$
如果把 -print0 的输出重定向到文件中,再用vim查看文件,就能看到末尾的 0x00 字符,表示为 ^@。
Linux很多命令其实都有类似
-print0这样的参数,它们的主要作用,是在管道或xargs命令的配合下,完成复杂操作,并规避可能的问题!有的时候,默认的分隔符如space或newline,会让命令之间的配合产生错误,比如文件名中有空格的时候。因此,find命令能用-print0的时候,都建议使用,命令间的相互配合会更加安全可靠。
expression里面的action部分可以有多个:
 find . -depth -print0
./102.jpg_renamed./101.png_renamed.
将找到的文件或空目录删除!
The
-deleteaction also implies-depth. 目录中的文件都被删除了,这个目录也可以被删除了!完整删除一个目录,有两种方式:(1)rm -rf <path>(2)find <path> -delete
如果使用 find ... | xargs rm 的方式,可能会出现搜索结果为空,rm命令提示一个错误出来。
find . -name '*.html' -delete
find . -name '*.html.gz' -delete
清空目录,只保留目录本身,以下两条等效:
$ cd path/to/dir
$ rm -r *
$ find . -delete
按inode number搜索:
$ find . -inum 263013
./aa
用stat命令可以查看文件的inode number。这个参数的一个应用场景为,有可能文件名会因为有一些特殊符号而无法正常删除,此时可以用find找出文件对应的inode并删除:
$ find . -inum <inode_number> -delete
这个参数用来搜索空文件和空文件夹。空文件就是长度为0的文件,空文件夹就是没有任何文件的文件夹。
 ll
total 8
drwxrwxr-x  2 xinlin xinlin 4096 5月  30 18:07 ./
drwxr-xr-x 25 xinlin xinlin 4096 5月  30 17:28 ../
$ find . -empty
.
$ touch a b c
$ find . -type f -empty
./a
./b
./c
$ mkdir -pv d
mkdir: created directory 'd'
$ find . -type d -empty
./d
find命令默认的action是-print,使用-exec时,就是用户自定义action。
We should note that this is not our shell executing the command, rather we’re using Linux’s exec directly to execute the command. This means that any shell expansion won’t work here as we don’t have a shell. Another effect is the unavailability of shell functions or aliases. As a workaround for our missing shell functions, we could
exportthem and callbash -cwith our requested function on our file.
注意:用-exec自定义action时,action命令不是在shell中运行!是由find创建子进程,运行命令行提供的action命令程序。显然,还可以使用xargs命令,它也不是在shell中运行程序。
不是在shell中运行程序,shell自带的各种功能不再起作用,当前路径下明明存在的脚本,会提示找不到,等等。
$  find . -type f -exec echo T: {} \;
T: ./101.png
T: ./102.jpg
echo是command;
{}是placeholder,用来替换find的结果,这个placeholder可以多次出现;
\;是delimiter,表示-exec后面的命令行结束,必须要用\转义,这个delimiter表示用find结果的一行来替换placeholder;
$ find . -type f -exec echo All: {} +
All: ./101.png ./102.jpg
+表示将find的结果一起用来替换placeholder;
用-exec配合许多常用的命令,可以高效率地做很多事情,比如:
用du显示find出来的每个文件的大小:
$ find . -type f -exec du -sh {} \;
84K ./101.png
44K ./102.jpg
用cp和mv修改find出来的每个文件的名称:
$ find . -type f -exec cp {} {}.bk \; -exec mv {} {}.origin \;
$ ll
total 264
drwxrwxr-x  2 xinlin xinlin  4096 5月  31 14:27 ./
drwxr-xr-x 25 xinlin xinlin  4096 5月  31 14:11 ../
-rw-rw-r--  1 xinlin xinlin 85396 5月  31 14:27 101.png.bk
-rw-rw-r--  1 xinlin xinlin 85396 9月  27  2020 101.png.origin
-rw-rw-r--  1 xinlin xinlin 44809 5月  31 14:27 102.jpg.bk
-rw-rw-r--  1 xinlin xinlin 44809 2月  24 10:29 102.jpg.origin
跟xargs命令配合:
$ find . -type f -print0 | xargs -0 -n1 echo
./102.jpg.bk
./102.jpg.origin
./101.png.origin
./101.png.bk
Like -exec but ask the user first. If the user agrees, run the command. Otherwise just return false. If the command is run, its standard input is redirected from /dev/null.
这就是个带用户提示的-exec:
 touch a.txt b.txt c.txt
xinlin@K:~/test$ find . -empty -ok rm {} \;
< rm ... ./a.txt > ? y
< rm ... ./b.txt > ? y
< rm ... ./c.txt > ? y
find命令默认会递归进入所有的子目录,-maxdepth参数可以控制递归深度。
-maxdepth 1 # 仅对指定目录进行搜索,不进入任何子目录
本文链接:https://cs.pynote.net/sf/linux/shell/202110025/
-- EOF --
-- MORE --