
Last Updated: 2023-11-18 13:30:46 Saturday
-- TOC --
用Linux环境的同学,一定离不开SSH(Secure Shell)这个非常重要的登录工具!ssh除了实现登录之外,还有很多我们离不开的其它功能。
- openssh官方网站:https://www.openssh.com/
- 配合ssh,tmux也是个不可或缺的工具!
历史上,网络主机之间的通信是明文通信,不加密。这使得通信很不安全,一个典型的例子就是远程服务器的登录。登录远程服务器,需要用户输入账户和密码,并传给服务器,如果这个过程是明文通信,就意味着传递过程中,线路经过的所有中间设备都能看到账号和密码,这...
SSH就是为了解决这个问题而诞生的,它加密计算机之间的通信,保证不被窃听或篡改。它还能对使用者进行认证(authentication)或授权(authorization),明文的网络协议可以套在它的里面使用,从而实现加密通信。
1995年,芬兰赫尔辛基工业大学的研究员 Tatu Ylönen 设计了SSH协议的第一个版本,同时给出了第一个实现(称为 SSH1)。当时,他所在的大学网络一直发生密码嗅探攻击(sniffing),他不得不为服务器设计一个更加安全的登录方式。写完SSH1以后,他就把这个工具公开了,并允许其他人免费使用。
嗅探(Sniffing)是指不间断地监听网络,截获用户传给服务器的账户和密码,记录下来后另外使用。
SSH1可以替换 rlogin、TELNET、FTP 和 rsh 这些不安全的协议,所以大受欢迎,用户快速增长,到1995年底,已经发展到五十个国家的20000多个用户。SSH1协议也变成 IETF 的标准文档。
1995年12月,由于客服需求越来越大,Tatu Ylönen成立了一家公司叫SCS,专门销售和开发SSH软件,SSH软件的后续版本,逐渐从免费软件变成了专有的商业软件。由于SSH1协议存在一些安全漏洞,所以1996年SCS公司又提出了 SSH2 协议(或者称为SSH2.0)。这个协议与SSH1.0版本不兼容。1997年SSH2进行了标准化,1998年推出SSH2的软件实现。但是,官方的 SSH2 软件是一个商业软件,不能免费使用。
1999年,OpenBSD的开发人员决定写一个SSH2协议的开源实现,这就是著名的OpenSSH项目。该项目最初是基于SSH1.2.12版本,那是当时SSH1最后一个开源版本。但是,OpenSSH的开发者很快就完全摆脱了原始的官方代码,在许多开发者的参与下,按照自己的路线发展。OpenSSH随OpenBSD2.6版本一起提供,以后又移植到其他操作系统,成为最流行的SSH实现。现在,几乎所有的Linux发行版都自带OpenSSH。OpenSSH还提供一些辅助工具软件(比如ssh-keygen,ssh-agent等)和专用的客户端工具scp和sftp。本文所有技术内容,均以OpenSSH为基础。
现在还有谁会去使用收费的SSH2呢?Tatu Ylönen如果不成立公司,一直保持SSH的开源免费状态,现在会是什么样呢?不过,1995年发生的这些,的确太早了......我一直深深感到自己的落后......
除了安全登录服务器,SSH还可以用来创建Tunnel(隧道)和Port Forwarding(端口转发),为其它自身没有安全加密功能的业务提供一条安全的通道。
ssh属于C/S(Client-Server)架构。客户端使用名为ssh的客户端程序连接服务器,服务器端由后台进程sshd负责为登录用户启动shell。服务器端sshd默认在22号端口上监听。C/S两端的通信全部通过加密通道传输。
How SSH Works
When you connect through SSH, you will be dropped into a shell session, which is a text-based interface where you can interact with your server. For the duration of your SSH session, any commands that you type into your local terminal are sent through an encrypted SSH tunnel and executed on your server.
The SSH connection is implemented using a client-server model. This means that for an SSH connection to be established, the remote machine must be running a piece of software called an SSH daemon. This software listens for connections on a specific network port, authenticates connection requests, and spawns the appropriate environment if the user provides the correct credentials.
The user’s computer must have an SSH client. This is a piece of software that knows how to communicate using the SSH protocol and can be given information about the remote host to connect to, the username to use, and the credentials that should be passed to authenticate. The client can also specify certain details about the connection type they would like to establish.
有些Linux发行版默认没有安装openssh-server,有些安装了但默认并不启动sshd,只有将sshd运行起来,才能够通过网络登录。设置开机启动sshd和启动sshd的相关命令如下:
$ sudo systemctl enable sshd   # start sshd when power on
$ sudo systemctl start sshd    # start sshd
$ sudo systemctl restart sshd  # restart sshd daemon
$ sudo systemctl restart ssh   # Ubuntu uses ssh to indicate sshd
$ sudo apt install openssh-server
安装成功后,sshd进程(SSH服务器后台进程的名称)就运行起来了,非root账户可以直接登录(有的云服务器在初始化后,只有root账户,此时只能用root登录)。同时,SFTP也自动运行起来,SFTP与SSH使用相同端口。(注意:SFTP与FTPS是不一样的)
树莓派官方提供的系统自带SSH Server,不过要通过配置启动才可以使用。Lite系统启动SSH Server的方法如下:
$ sudo raspi-config
然后选择 3 Interface Options --> P2 SSH,按提示打开启动即可。
SSH服务器的配置文件:
$ sudo vim /etc/ssh/sshd_config
修改配置后,需要重启sshd进程:
$ sudo systemctl restart sshd
关于sshd配置文件,有详细的manpage:
$ man 5 sshd_config
sshd的配置文件中,可能没有指定具体的协议版本,anyway,增加一个版本信息不复杂,还可以提高安全性:
Protocol 2
SSH服务器默认的监听IP为运行主机上所有IP地址,默认端口号为22。
Port 22                          # default listen port
Port 12345
ListenAddress 0.0.0.0            # listen on all ip, no port specified
ListenAddress 0.0.0.0:12345      # listen on all ip and with port 12345
ListenAddress 192.168.1.8:12345  # listen on 192.168.1.8:12345
SSH服务器可以同时在多个端口上监听,配置多条Port即可。公网上的服务器为了安全,很多时候不会在22号默认端口上监听,而是会选择一个自定义的端口号,虽然带来的安全提升很有限,但还是有很多这么做。
- 在切换SSH监听端口的时候,可以先让其同时在两个端口上监听,然后再去掉其中一个,这样可以保证SSH的连接在修改配置时,不会被中断。如果直接将端口号从一个端口号修改到另一个,重启sshd后,当前连接可能会中断,然后你再去连新端口号,可能会由于一些其它配置方面的问题,导致彻底无法连接了,这会很麻烦。
- 有的时候在修改SSH监听端口后,无法成功连接,很可能是因为你的服务器外有一层防火墙,比如云服务器供应商一般都会提供防火墙机制,你可以配置防火墙规则,让放行自定义的端口。
禁止root用户登录,是为安全考虑,阿里云的云盾就有这么一个检查项,叫做SSH登录基线检查,查的就是这个配置。
PermitRootLogin no # yes
还可以配置为:禁止root登录,但允许root执行某些特定的命令:
PermitRootLogin forced-commands-only
此时,root只能使用key的方式连接host,执行在/root/.ssh/authorized_keys中明确的命令,在key前面增加command=,格式如下:
command="/path/to/command arg1 arg2" ssh-rsa ...
在修改PermitRootLogin参数前,建议先完成ssh-copy-id,修改authorized_keys等动作。
AllowUsers xinlin-z abc xyz
多个用户名用空格分隔开即可。
登录需要认证,禁止密码,实际上就是禁止用户使用密码登录服务器。(现在使用秘钥登录也很常见和流行)
PasswordAuthentication no
默认不允许无密码登录,但是如果你的环境非常安全,是实验室内部环境,想把烦人的密码输入省掉,可以打开这个功能:
PermitEmptyPasswords yes # no
如果不配置服务器心跳,常常遇到的情况就是,ssh session无操作一段时间,连接就终止了。要不断地重连,挺烦人的。所以,还是配上心跳吧,保持整条链路alive:
ClientAliveInterval 90
ClientAliveCountMax 5
- ssh session一段时间不操作后断开连接,常常是因为长时间没有数据传输,这条连接被中间的路由器掐断了(什么原理?应该是防火墙干的吧?)。有了心跳就可以解决这个问题。SSH Port Forwarding通道的Keep alive,也依赖这个机制。这个机制也可以在ssh client上配置,效果一样。!?
- 关于保活,还有个TCPKeepAlive配置项,打开也无妨,只是它们工作在不同层面,而且TCPKeepAlive保活的效果可能并不好,据说防火墙可能丢弃保活报文,似乎很少见到真正依赖TCP层保活机制的实现?!
有了X11Forwarding的加持,我们就可以通过SSH客户端直接运行对端主机上的GUI程序。这个功能在调试GUI程序的时候,异常的方便。
X11Forwarding yes
AllowTcpForwarding yes
后面有对端口转发功能的详细介绍。
AllowAgentForwarding yes
后文详细介绍。
sftp是ssh服务器自带的一个功能,默认的配置和建议配置如下:
Subsystem sftp /usr/lib/openssh/sftp-server  # default
Subsystem sftp internal-sftp                 # recommended?
Subsystem sftp none                          # disable sftp
以上前两行配置,任何时候只能保留一行。(用#注释掉其中一行即可)
internal-sftp和sftp-server有什么区别?
In SSHD configuration,
internal-sftpandsftp-serverare two different subsystems that can be used to provide SFTP (SSH File Transfer Protocol) access.The internal-sftp subsystem is a built-in SFTP server that is included with OpenSSH. It runs within the sshd daemon process and provides a more secure chrooted environment for SFTP users. When the internal-sftp subsystem is used, it restricts the user's shell access to only SFTP, preventing them from running any other commands or accessing the system in any way.
On the other hand, sftp-server is an external SFTP server that is executed as a standalone binary outside of sshd. It allows for more flexibility and customization, such as configuring different logging options or setting up virtual hosts. However, it also requires additional setup and configuration compared to the built-in internal-sftp subsystem.
So, the main difference between "internal-sftp" and "sftp-server" is that the former is a built-in and more secure solution, while the latter is an external and customizable option.
internal-sftp是bultin,更安全。sftp-server是一个独立的进程,更强可定制化。
远程登录前可以显示给用户的信息,通过在Banner字段后指定一个文件来实现,文件内容不支持转义:
Banner none  # this is default config
Banner /etc/issue.net
传统上都是使用/etc/issue.net文件,具体参考:issue,motd文件
用Banner防止非法登陆
用sshd的Banner这个方法,只能防止一些很弱的非法登录程序,实施这个方法也很简单:在Banner的内容中,增加Access denied关键字。
登录后是否显示Motd(Message of today),由下面这条配置控制:
PrintMotd no
看到一个别人的故障说明:motd信息在登录的时候,显示了两次!因为sshd配置了PrintMotd yes,pam也配置了显示motd,去掉其中一个就OK了。
主流OS系统一般都自带SSH客户端,Windows10系统除了可以在cmd窗口里直接使用ssh之外,还有很多独立的可以用来做SSH客户端的软件,比如我比较喜欢的MobaXterm。Putty也是一个非常著名的SSH客户端软件。
客户端配置的manpage:
$ man 5 ssh_config
Windows7系统没有自带的ssh客户端,需要自己安装。Windows10系统有自带的,但你可能对版本不满意。搜索openssh for windows,或者访问https://www.mls-software.com/opensshd.html,装好后在cmd窗口就可以使用ssh客户端了。
-V# on my raspberry pi
$ ssh -V
OpenSSH_7.9p1 Raspbian-10+deb10u2+rpt1, OpenSSL 1.1.1d 10 Sep 2019
-v,-vv,-vvv在使用ssh客户端连接某台主机的时候,如果加上-v参数,会打印出非常多的debug信息,用以辅助调试网络连接方面的问题。可以使用多个v,显示出来的信息更多,最多3个。
-l,-p$ ssh -l pi 192.168.2.107 -p 22
$ ssh pi@192.168.2.107:22
-l(小写L)跟用户名,-p跟端口号,上面两种写法等效!如果不指定端口号,端口号默认使用22。如果不指定用户名,默认使用登录当前系统的用户名(Windows系统下基本上就是Administrator)。
如果你无法配置sshd服务器,而且很不幸这台服务器没有配置心跳,你可以配置客户端发起心跳。客户端配置文件如下:
$ sudo vim /etc/ssh/ssh_config  # different with sshd_config
# configurate items
TCPKeepAlive yes
ServerAliveInterval 30
ServerAliveCountMax 5
保持TCP连接,客户端每30秒发一次心跳给服务器,如果连续5次都收不到服务器的心跳回复,就断开连接。30和5可按需配置。如果sshd配置了Client保活心跳,同时Client也配置了Server保活心跳,测试发现,这种情况下,只有配置间隔较小的心跳起作用。
-ossh客户端的配置文件是按Host进行配置(后文有详细说明)。通过-o选项,可以覆盖配置文件中的设置(或者提供配置文件中没有的配置项):
$ ssh -o ServerAliveInterval=15 \
-o ServerAliveCountMax=5 username@serverip -p port_number
$ ssh -Q cipher
-F <config_file>在命令行指定配置文件,此时全局配置文件/etc/ssh/ssh_config被忽略。也可以使用-F none,表示不读取任何配置文件。
ssh通信是加密的,而且加密算法按什么优先级选择,可以自己设置,使用-c参数。
-c cipher_spec

Selects the cipher specification for encrypting the session. cipher_spec is a comma-separated list of ciphers listed in order of preference.  See the Ciphers keyword in ssh_config(5) for more information.
我理解,如果-c参数后面只有一个加密算法,相当于指定了用此算法。
下面这段,来自man 5 ssh_config:
Ciphers
    Specifies the ciphers allowed and their order of preference.  Multiple ciphers must be comma-sepa‐
    rated.  If the specified list begins with a ‘+’ character, then the specified ciphers will be ap‐
    pended to the default set instead of replacing them.  If the specified list begins with a ‘-’
    character, then the specified ciphers (including wildcards) will be removed from the default set
    instead of replacing them.  If the specified list begins with a ‘^’ character, then the specified
    ciphers will be placed at the head of the default set.

    The supported ciphers are:

        3des-cbc
        aes128-cbc
        aes192-cbc
        aes256-cbc
        aes128-ctr
        aes192-ctr
        aes256-ctr
        aes128-gcm@openssh.com
        aes256-gcm@openssh.com
        chacha20-poly1305@openssh.com

    The default is:

        chacha20-poly1305@openssh.com,
        aes128-ctr,aes192-ctr,aes256-ctr,
        aes128-gcm@openssh.com,aes256-gcm@openssh.com

    The list of available ciphers may also be obtained using "ssh -Q cipher".
仔细阅读,+,-和^分别对应不同的配置方式。
开启ssh客户端ForwardAgent功能:-A
开启ssh客户端ForwardX11功能:-X
配置检查server host key的级别
ssh建立连接的过程中,server会将自己的public key发给client,这样才能安全的通信。
默认配置时,当ssh第1次连接某台server时,ssh client界面都会弹出一个提示,显示server key fingerprint,让用户选择yes/no。如果选择yes,ssh client就会将这个fingerprint保存在know_hosts文件中,下次连接的时候,自动对比,对比成功则不再提示,对比不成功,则拒绝连接,给出Warning!
ssh client端可以配置:
StrictHostKeyChecking no   # no checking,并会自动将fingerprint添加到know_hosts文件
StrictHostKeyChecking ask  # default
StrictHostKeyChecking yes  # safest,如果key不匹配,拒绝连接,没有详细信息提示
示例:
$ ssh root@1.1.1.1 -p 12345 -i key.key -o StrictHostKeyChecking=yes
No ED25519 host key is known for [1.1.1.1]:12345 and you have requested strict checking.
Host key verification failed.
当ssh服务器因为各种原因,它的key发生了变更,就会导致ssh client连接时,fingerprint不匹配。
~/.ssh/config文件SSH的参数配置有3个层次:
-p 10086, -i /path/to/identity_file等选项。~/.ssh/config,此文件默认不存在,需要手动创建。/etc/ssh/ssh_config。参数的使能顺序是1 > 2 > 3。
示例:
Host aliyun
    HostName 1.1.1.1
    User tom
    Port 12345
    IdentityFile ~/.ssh/private.key
Identityfile,不是Identifyfile!不要写错了...
有了这个配置文件后,以下两行命令等效:
$ ssh aliyun
$ ssh tom@192.168.12.34 -p 12345 -i ~/.ssh/private.key
配置文件的主要规则如下:
参数名 参数值或参数值=参数名的形式,其中参数名不区分大小写,而参数值区分大小写,如上面的参数名HostName和Hostname是同一个参数。Host参数来区分,一个配置文件里面可以有针对多个Host的配置。#开头的是注释行。可以使用wildcard,实现同时配置多个Host的效果(默认的system wide配置文件,虽然整个都被注释掉了,但是还是能看到Host *字样):
You can also use wildcards to match more than one host. Keep in mind that later matches can override earlier ones.
Host *
    ForwardX11 no
    ServerAliveInterval 120

Host testhost
    HostName your_domain
    ForwardX11 yes
    Port 4444
    User demo
关于配置文件的更多信息,参考:
$ man ssh_config
-F <config_file>,指定一个per-user的配置文件。如果命令行指定了per-user配置文件,system-wide的配置文件/etc/ssh/ssh_config将被忽略。如果在命令行使用-F none,ssh不再读取配置文件。
一般云服务器部署成功后,系统中默认就有了一组key:
$ ll /etc/ssh/ssh_host_*
-rw------- 1 root root 1.4K Apr 17  2022 /etc/ssh/ssh_host_dsa_key
-rw-r--r-- 1 root root  607 Apr 17  2022 /etc/ssh/ssh_host_dsa_key.pub
-rw------- 1 root root  513 Apr 17  2022 /etc/ssh/ssh_host_ecdsa_key
-rw-r--r-- 1 root root  179 Apr 17  2022 /etc/ssh/ssh_host_ecdsa_key.pub
-rw------- 1 root root  411 Apr 17  2022 /etc/ssh/ssh_host_ed25519_key
-rw-r--r-- 1 root root   99 Apr 17  2022 /etc/ssh/ssh_host_ed25519_key.pub
-rw------- 1 root root 2.6K Apr 17  2022 /etc/ssh/ssh_host_rsa_key
-rw-r--r-- 1 root root  571 Apr 17  2022 /etc/ssh/ssh_host_rsa_key.pub
这一组key是别人给你用的!为了安全,建议重新生成一组key:
$ sudo ssh-keygen -t rsa -b 4096 -f /etc/ssh/ssh_host_rsa_key
$ sudo ssh-keygen -t dsa -f /etc/ssh/ssh_host_dsa_key
在登录ssh的命令后面,跟上一组命令字符串,就实现了远程命令的执行:
$ ssh -l <name> <domain|ip> [-p <port>] <command>
$ ssh name@domain|ip [-p <port>] <command>
$ ssh -l <name> <domain|ip> [-p <port>] 'pwd; cd ~/repos;ls'
这后面跟着的命令,在输入密码成功登录后,都会在远端被执行,执行完后,ssh连接立即中断。当需要远程执行有交互的命令时,比如在远程主机上执行top命令,需要使用-t参数,来显式地告诉ssh提供一个TTY:
$ ssh name@domain|ip [-p <port>] -t <command>
示例:
$ uname -a
Linux goodday 5.10.16.3-microsoft-standard-WSL2 #1 SMP Fri Apr 2 22:23:49 UTC 2021 x86_64 x86_64 x86_64 GNU/Linux
$ ssh -l xinlin 114.215.183.12 -p 18962 uname -a
xinlin-z@1.1.1.1's password:
Linux aliyun 5.16.16-200.fc35.x86_64 #1 SMP PREEMPT Sat Mar 19 13:52:41 UTC 2022 x86_64 x86_64 x86_64 GNU/Linux
管道在本地shell中起作用,ssh可以从管道中接收数据:
An often overlooked feature of ssh is the ability to run commands directly.
ssh foobar@server lswill execute ls in the home folder of foobar. It works with pipes, sossh foobar@server ls | grep PATTERNwillgrep locallythe remote output of ls andls | ssh foobar@server grep PATTERNwillgrep remotelythe local output of ls.
本地有一个shell脚本,也可在远端的主机上执行:
$ ssh name@domain|ip [-p <port>] 'bash -s' < test.sh
有一些小工具,可以实现自动输入ssh密码,比如sshpass。这里推荐开源的autopass!纯Python开发,无第三方库依赖,就200行左右代码,专注于实现自动输入ssh密码,以及sudo时的密码自动输入。
SSH Port Forwarding,SSH端口转发,也称为Tcp Forwarding,其又分为本地端口转发(Local Port Forwarding),远端端口转发(Remote Port Forwarding)和动态转发(Dynamic Port Forwarding)三种。端口转发是非常实用的技术,它能够将其他TCP端口的网络数据通过SSH链路转发,并且自动提供了加解密和压缩服务。
SSH有个Tunnel技术,这是个3层概念,可以用来实现SSH-Based虚拟私有网络,而Port Forwarding是4层概念。
打开SSH端口转发功能:
AllowTcpForwarding yes
将一个可SSH连接的主机可访问的端口拉到本地局域网。
本地端口转发,通过访问本地局域网内的端口,实现访问另一个通过SSH连接的远程端口的效果。这个功能常用来正面穿透防火墙。远端端口为ssh服务器可访问端口,不局限在ssh服务器locahost范围。
比如下图示例,A和X在防火墙外,B和C在防火墙内,A和X不能直接访问B和C上的资源,幸运的是,A可以通过SSH连接B,此时,我们就可以通过SSH的本地端口转发功能,实现A任意访问B和C上的资源,也可以让X通过A实现同样的访问。如下图:

主机A上的配置:
A$ ssh [-g] [-N] [-f] -L 12345:host:23456 username@B -p port
-L,表示开启Local Port Forwarding功能。12345:remotehost:23456,这是最烧脑的部分,主机A上开启端口12345,对应的端口是host:23456,这是主机B可以访问的地址,可以还B自己,此时host就是localhost,也可以是主机C,此时host就是C的ip地址。Local Port Forwarding采用远端主机B的视角解析这行配置的后面部分,因为目标端口要通过主机B来访问,即host:23456 from B。username@B -p port,SSH连接的主机B信息。-N,表示SSH连接之后,不打开shell。-f,表示此连接进程后台运行,当前shell还可以干别的,但是关闭shell窗口会导致此进程也被关闭,这个参数要与-N一起使用!-g,gateway,表示A在局域网内开放自己的12345端口,此时X可以通过访问A的12345端口,实现访问host:23456。这相当于在A的自己所有接口上监听12345端口,而不仅仅是在loopback接口上监听,-g参数只对local port forwarding有效。-L 参数是必须的,-g,-f和-N可选。
一个主机B可以访问的端口,通过ssh的local port forwarding功能,被拉倒主机A上,并可实现在主机A的局域网内被访问。
将一个本地可访问的端口用SSH连接推到远端主机。
如果说本地端口转发是正面穿透防火墙,那么远端端口转发就是反向穿透,从内向外打通一条TCP链路。remote port forwarding这个功能,几乎是最简单的内网穿透方案。
如下图所示,A和X在防火墙外,B和C在防火墙内部,A和X不能访问防火墙内部,不幸的是,A和X也不能通过SSH连接B和C。幸运的是,B可以在防火墙内部通过SSH连接A,此时可以在B上发起远端端口转发,实现A和X可以任意访问B和C的资源。
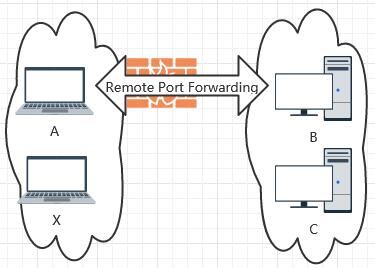
主机B的配置如下:
B$ ssh [-N] [-f] -R 12345:host:23456 username@A -p port
-R,表示开启Remote Port Forwarding功能。username@A -p port,ssh连接远端主机A。12345:host:23456,12345是远端主机A上的端口,表示通过远端主机A上的此端口,相当于通过SSH的远端端口转发,访问了host:23456,host:23456是B可以访问的资源,如果是B自己,可以写localhost,如果是C,host就写C的ip地址,即host:23456 from B。这样,主机A就可以反过来访问B或C了!但是主机X还是不能访问,默认情况下,A只在自己的loopback上监听12345端口。要实现X也能够像A一样访问B或C,这里提供以下3个思路:
A$ ssh -g -N -L 56789:localhost:12345 localhost
访问A的56789,相同于访问A的12345,也就相当于访问B或C了。
这个方法最好,默认主机A上的端口只在loopback接口上监听,如果主机A在公网,这是必须的。而X建立加密链接到A,去访问A的localhost,整个链路都有加密。
/etc/ssh/sshd_config,让主机A在所有端口上监听映射的端口GatewayPorts yes
修改这个配置为yes后,重启sshd后生效,此时默认remote port forwarding的端口,会在remote host的所有接口上监听。如果host在公网,相当于端口就直接暴露在公网上了,慎用!
不同于前两种端口转发,动态端口转发不限制访问的地址,因此被称为动态。
$ ssh -D [listen_ip:]12345 username@remotehost -p port
-D,Dynamic Port Forwarding在本地建立一个动态端口转发,监听地址为[listen_ip:]12345,访问此12345端口时,所有访问流量全部通过加密的TCP链接,转发到remotehost,然后再转发出去。(listen_ip为配置主机上的合法ip地址,如果省略,即为默认的localhost,可以是0.0.0.0)
技巧01:多条SSH端口转发路径可以相互之间连接,组合形成一条更长的转发链路。
技巧02:在网速慢而且不是主要传视频的情况下,可以使用-C参数,开启压缩传输。虽然时延有所增大,但单位时间内传输的有效数据量能显著提升。
技巧03:不管是Server还是Client,都可以配置链路保活心跳(间前面配置部分的说明),这个心跳配置对于端口转发也适用(抓包验证)。因此,不用太担心长时间没有数据的TCP连接的保活问题。不过,还是会有各种原因导致中间的TCP连接被中断。
......
使用ssh秘钥登录会更加的安全,下面这段文字给出了解释,前提是,保护好你的私钥!
How Do SSH Keys Enhance Security?
With SSH, any kind of authentication — including password authentication — is completely encrypted. However, when password-based logins are allowed, malicious users can repeatedly, automatically attempt to access a server, especially if it has a public-facing IP address. Although there are ways of locking out access after multiple failed attempts from the same IP, and malicious users will be limited in practice by how rapidly they can attempt to log in to your server, any circumstance in which a user can plausibly attempt to gain access to your stack by repeated brute force attacks will pose a security risk. (如果启用密码认证,总可以去尝试暴力破解,如果使用秘钥,连暴力破解的机会都没有)
To authenticate using SSH keys, a user must have an SSH key pair on their local computer. On the remote server, the public key must be copied to a file within the user’s home directory at
~/.ssh/authorized_keys. This file contains a list of public keys, one-per-line, that are authorized to log into this account. (ssh-copy-id命令就是修改这个文件)When a client connects to the host, wishing to use SSH key authentication, it will inform the server of this intent and will tell the server which public key to use. The server then checks its authorized_keys file for the public key, generates a random string, and encrypts it using the public key. This encrypted message can only be decrypted with the associated private key. The server will send this encrypted message to the client to test whether they actually have the associated private key.
ssh client告知server用秘钥认证,并且会指定某个公钥。server生成一个random string,用此公钥加密,然后发送给client。
Upon receipt of this message, the client will decrypt it using the private key and combine the random string that is revealed with a previously negotiated session ID. It then generates an MD5 hash of this value and transmits it back to the server. The server already had the original message and the session ID, so it can compare an MD5 hash generated by those values and determine that the client must have the private key.
client收到加密信息后,用私钥解密。然后用此random string和已经协商好的session id,生成一个md5 hash value,发给server验证。(也许可以用更安全的hash算法)
总之,私钥不丢,安全不愁!
在命令行直接运行ssh-keygen,直接回车几次(默认参数),就可以在~/.ssh目录中生成两个以id_开头文件,一个私钥,一个公钥!下面是ssh-keygen命令的常用参数:
-t,选择加密算法,默认使用RSA算法
-b,秘钥长度,默认2048bits
-f,指定生成的文件及路径,生成两个文件,公钥用.pub后缀表示
-C,注释Comments,默认为hostname@username
-p,修改或移除passphrase
-l,显示秘钥的fingerprint,此时配合-f指定input file(配对的私钥和公钥,它们的fingerprint是一样的)
ssh-keygen生产的public key文件格式,与openssl略有不同,前面有ssh-rsa前缀,后面有用-C生产的comments,下面是一个公钥内容示例:
$ cat ~/.ssh/id_rsa.pub
ssh-rsa AAAAB3NzaC1yc2EAAAADAQABAAABgQCtTajTMbZPSinFDPIvAMRkBdy03j52zXyLNUk9tsJaurS23eAW2Dr6qEiFRLEVfZ8Kh/KJwxdB8OnJlhWYSJWUQF0+8mxEZ6/tw7XHH3o5+WLcD5/W25tY8hEuAVqgUn4X0P3W4yuFhkEUawnKHQwFFvkOz0E7kJVsMCEeui0NKEKqEKftOUjdB1C/SVren9jmAr9ksqS3snzB5NKDGkk2OytrMQw3yqj054xyFQ81G+a1U7NHJiQf5RozvYxKWFwqIMoNZBOhf8EGZqKekoFvKtBJYFkMC8J8+G9SSx1su2+vsdZkbLAu5VnMgsDZxTaIpGO0PKkY+kUY8sZIRRu6MyGtk0EwTzZDH+E7pDgT/B/cOCKstVzUfg1gfWFKjssqNFm0U2qYq3Qnul5f5Qydgn1hBGP2qnFSqoPG5fH23JJmBXNlqchQzlbsgzLCCb/7JzXQM09mciF2jEgavZUh32ajw4n2qRZPs7s5ShwIUStX2gTpFXM66F+XM33R0I0= xinlin-z@K
看起来像是base64编码,还没有仔细研究...
把你的密钥复制到服务器上,可以使用便捷的ssh-copy-id命令:
$ ssh-copy-id -i path/to/pub_key yourname@example.com
注意:此时-i参数后面跟的是public key!
也可以手动copy public key到Server的~/.ssh/authorized_keys,效果一样。
-i参数指定私钥秘钥登录时,使用-i参数指定某个具体的私钥:
$ ssh root@ip -i <path/to/private_key>
$ ssh -NCD 192.168.16.104:54321 root@ip -i ~/.ssh/private_key
-i参数!0600,即只允许owner读写。当本地有多个私钥,这些私钥对应不同的Server时,除了-i参数在命令行指定具体的私钥,还可以通过配置文件来简化输入,见后。
在使用ssh-keygen创建秘钥对的时候,有一个输入passphrase的提示。什么是passphrase?
By default, you will have to enter any passphrase you set here every time you use the private key, as an additional security measure. Feel free to press ENTER to leave this blank if you do not want a passphrase. Keep in mind though that this will allow anyone who gains control of your private key to login to your servers.
如果设置passphrase,每次使用private key的时候,都需要输入这个passphrase,它就像是使用private key的密码。不设置当然也是可以的,只要保护好private key文件!
-p,修改或移除passphrase:
$ ssh-keygen -p
当你使用秘钥登录,同时又设置了passphrase,每次使用秘钥时,还是要输入一个passphrase,挺烦人的。ssh-agent进程,就是用来解决这个问题的。它将秘钥保存在内存中,ssh client向ssh-agent请求是否有某个host的私钥,如果有,就直接拿过来使用,不用再输入passphrase。
命令行启动ssh-agent时有个小技巧,ssh-agent会输出3行指令,在当前shell下执行,ssh client才能够与ssh-agent通信,因此,启动ssh-agent是这样的:
$ eval $(ssh-agent)
以下是ssh-agent启动时的输出:
$ ssh-agent
SSH_AUTH_SOCK=/tmp/ssh-XXXXXXjDMe30/agent.1363873; export SSH_AUTH_SOCK;
SSH_AGENT_PID=1363874; export SSH_AGENT_PID;
echo Agent pid 1363874;
ssh-agent是一个daemon进程,在后台执行。
使用eval命令,等于直接执行了ssh-agent输出的指令,export两个环境变量,Unix Domain Socket文件和PID。此时,ssh client就可以与ssh-agent通信了。
多shell共享ssh-agent
只要在shell中export具有相同值的环境变量即可,方法多种多样。下面是我个人的一个方法:
$ echo $(ssh-agent) > ssh_agent_script.sh
此后,在任何shell中执行:
$ . ssh_agent_script.sh # run script in current process
就能够使用一个相同的后台ssh-agent进程。
管理ssh-agent进程保存的私钥,需使用ssh-add命令。添加(仅此时输入一次passphrase),查看-l,删除...ssh-add命令有个神奇的功能,它可以设置一个密码,然后将ssh-agent锁起来。此时ssh-agent不再对外提供任何服务。
-x,设置个密码,将ssh-agent锁起来。
-X,用相同的密码解锁,然后这个密码就没用了,下次锁ssh-agent,还需要重新设置密码。
Agent Forwarding的使用场景:
你在本地启动了ssh-agent进程,添加了一堆私钥。此时,你ssh到某台主机A,在这A上,你也希望能够使用相同的私钥。此时,你本地的ssh-agent可以将保存的私钥发送给A,你在server上就可以直接使用此私钥,就像在本地一样。这就是Agent Forwarding功能!
使用Agent Forwarding功能,你需要确保主机A上的sshd配置文件开启了此功能:
AllowAgentForwarding yes
在ssh连接server的时候,带上-A参数。
Agent Forwarding原理图,注意server上没有运行ssh-agent进程:

一切OK时,在server上使用ssh-add -l,也能够看到本地的私钥。
ssh的manual中有如下一段:
-A
Agent forwarding should be enabled with caution. Users with the ability to bypass file permissions on the remote host (for the agent's UNIX-domain socket) can access the local agent through the forwarded connection. An attacker cannot obtain key material from the agent, however they can perform operations on the keys that enable them to authenticate using the identities loaded into the agent. A safer alternative may be to use a jump host (see -J).
ssh提供的这些功能,估计系统管理员会大量使用,因为它们需要频繁登录很多服务器,程序员不怎么需要的...:)
在ssh客户端配置multiplexing的效果,多个连接相同目标地址的ssh连接(各种功能的连接都算),共享同一个TCP连接。有两个潜在的好处:
配置示例:
Host *
    ControlMaster auto
    ControlPath ~/.ssh/%r@%h:%p.sock
    ControlPersist 1  # second, default is no, can be yes
每当第1个连接目的Host的TCP出现时,ssh创建一个UNIX Domain socket文件,文件名规则:
%r表示remote user,%h表示hostname,%p表示port。此socket文件用于多个ssh客户端与server通信时,共享一路TCP连接。ControlPersist 1表示当最后一个ssh客户端断开连接,1秒后关闭TCP连接(此时socket文件也会被删除)。
-S none,绕过共享的TCP连接,单独创建一路TCP连接。
本文链接:https://cs.pynote.net/net/202109201/
-- EOF --
-- MORE --