-- TOC --
传统图像缩放算法的基本原理,就是根据原图像的像素值,通过一定的规则计算得到目标图像的像素值。图像缩放的两个关键问题是应该选取原图像中哪些像素值,以及如何确定选取的像素值的权重。图像缩放的常见问题是产生锯齿(缩小)或者模糊(放大)。
图像缩放,另一种专业术语,叫做插值(interpolation)算法。也可能被称为滤波算法(resampling filter),pillow官网使用这个说法。
According to Wikipedia, Interpolation is a method of constructing new data points within the range of a discrete set of known data points. Image interpolation refers to the “guess” of intensity values at missing locations.
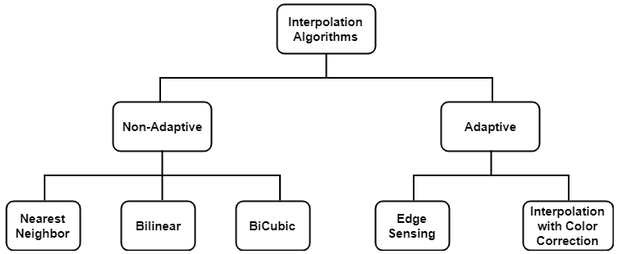
There are plenty of Interpolation methods available. Interpolation algorithms can be classified as:
Non-adaptive perform interpolation in a fixed pattern for every pixel, while adaptive algorithms detect local spatial features, like edges, of the pixel neighborhood and make effective choices depending on the algorithm.
这是最简单的算法,We assign the unknown pixel to the nearest known pixel,也是速度最快的算法。
在放大的时候,这个算法具有让每个像素变大的效果。
比较适合缩放 bar-code 这类图片。
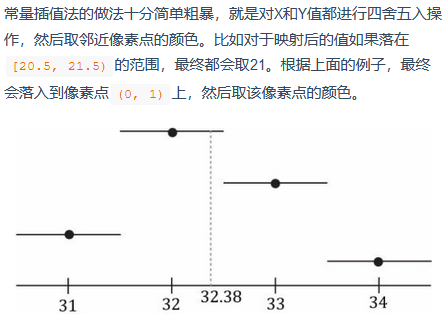
一种算法思路:计算目标尺寸pixel的位置百分比,用原图相同位置百分比的pixel来给目标pixel赋值。(这个思路其实就是采样,不仅可以采完全相同百分比位置的值,还可以采周围点的值,但需要知道pixel的宽占多少百分比)
我还看到一些教材上,将这种算法的名称叫为常量插值法。
上图是一维的,在二维的情况下,需要算法自己确定上下左右的neighbor选择,这叫2D nearest。
实践了一把,发现自己的代码,采用位置百分比的方式,计算得到的图片效果,相比opencv用相同算法(cv.INTER_NEAREST)得到的图片效果,相差很大。opencv得到的图片,效果更好。我自己的方法,经过与DirectX渲染效果对比(使用相同的位置百分比采样),效果基本一直,因此算法OK。
我的代码如下:
import numpy as np
import cv2 as cv
from decimal import *


# original width and height
origin_file = 'test_620x380.nv12.yuv'
owidth = 620
oheight = 380
oww = 1/owidth
ohh = 1/oheight


# target width and height
twidth = 700
theight = 450


# read original data to ya, ua, va
yuv = np.zeros((oheight,owidth,3), dtype=np.uint8)
with open(origin_file, 'rb') as f:
    for i in range(oheight):
        for j in range(owidth):
            yuv[i,j,0] = f.read(1)[0]
    for i in range(0,oheight,2):
        for j in range(0,owidth,2):
            yuv[i:i+2,j:j+2,1] = f.read(1)[0]
            yuv[i:i+2,j:j+2,2] = f.read(1)[0]


# convert to rgb
a = np.empty_like(yuv, dtype=np.int32)
a[:,:,0] = yuv[:,:,0].astype(np.int32) - 16
a[:,:,1:] = yuv[:,:,1:].astype(np.int32) - 128
x1 = 255 / 219
x2 = (255/224) * 1.402
x3 = (255/224) * 1.772
x4 = x3 * (0.114/0.587)
x5 = x2 * (0.299/0.587)
x = np.array(([x1,x1,x1],
               [0,-x4,x3],
               [x2,-x5,0]))
t1 = a.reshape(380*620,3) @ x
t1 = np.where(t1<0, 0, t1)
t1 = np.where(t1>255, 255, t1)
yuv = t1.reshape(380,620,3).astype(np.uint8)


# show origin
cv.imshow('imshow-origin', yuv[:,:,::-1])
cv.waitKey()

ryuv = cv.resize(yuv, (twidth,theight), cv.INTER_NEAREST)
cv.imshow('imshow-resize', ryuv[:,:,::-1])
cv.waitKey()


def get_neighbor(pos):
    #x = round(pos[0] / oww)
    x = Decimal(pos[0]/oww).quantize(Decimal('0'), rounding=ROUND_HALF_UP)
    if x > owidth-1: x = owidth-1
    #y = round(pos[1] / ohh)
    y = Decimal(pos[1]/ohh).quantize(Decimal('0'), rounding=ROUND_HALF_UP)
    if y > oheight-1: y = oheight-1
    return yuv[int(y),int(x),:]


tyuv = np.zeros((theight,twidth,3), dtype=np.uint8)
def start():
    tww = 1/twidth
    thh = 1/theight
    pos = [tww/2, thh/2]
    for i in range(theight):
        print(i)
        for j in range(twidth):
            tyuv[i,j,:] = get_neighbor(pos)
            pos[0] = pos[0] + tww
        else:
            pos[0] = tww/2
            pos[1] = pos[1] + thh


start()
# show enlarged
cv.imshow('imshow-enlarged', tyuv[:,:,::-1])
cv.waitKey()

从左到右,分别是DirectX渲染,我自己的代码,opencv。我写的代码,与DirectX中的像素做色器代码,估计之只是在rounding这个细节上有点差异:
VS_OUTPUT VS(float4 Pos: POSITION, float2 TexCoord: TEXCOORD0) {
    VS_OUTPUT output = (VS_OUTPUT) 0;
    output.Pos = Pos;
    output.TexCoord = TexCoord.xy;
    return output;
}

float4 YUV2RGB(float4 YUVA) {
    float C = (YUVA.r * 256) - 16;
    float D = (YUVA.g * 256) - 128;
    float E = (YUVA.b * 256) - 128;

    float R = clamp((298 * C + 409 * E + 128) / 256, 0, 256);
    float G = clamp((298 * C - 100 * D - 208 * E + 128) / 256, 0, 256);
    float B = clamp((298 * C + 516 * D + 128) / 256, 0, 256);

    return float4(R / 256, G / 256, B / 256, YUVA.a);
}

// Pixel Shader
float4 PS(VS_OUTPUT input): SV_Target {

    float width, height;
    g_texture[0].GetDimensions(width, height);
    uint y = g_texture[0].Load(int3(input.TexCoord.x * width, input.TexCoord.y * height, 0)).r;

    g_texture[1].GetDimensions(width, height);

    uint2 uv = g_texture[1].Load(int3(input.TexCoord.x * width, input.TexCoord.y * height, 0)).rg;

    //return float4((width == 1280) ? 1.0 : 0.0, 0, 0, 1.0);
    return YUV2RGB(float4(y / 255.0, uv.r / 255.0, uv.g / 255.0, 1.0));
}
后来发现,这居然是一个bug,没有正确地使用opencv接口!interpolation是keyword参数,在没有前面的一系列可选参数时,必须要加上这个keyword。
>>> b = np.arange(16).reshape(4,4)
>>> b
array([[ 0,  1,  2,  3],
       [ 4,  5,  6,  7],
       [ 8,  9, 10, 11],
       [12, 13, 14, 15]])
>>> b = b.astype(np.uint8)
>>>
>>> cv.resize(b, (8,8), cv.INTER_NEAREST)  ## bug!!
array([[ 0,  0,  1,  1,  2,  2,  3,  3],
       [ 1,  1,  2,  2,  3,  3,  4,  4],
       [ 3,  3,  4,  4,  5,  5,  6,  6],
       [ 5,  5,  6,  6,  7,  7,  8,  8],
       [ 7,  7,  8,  8,  9,  9, 10, 10],
       [ 9,  9, 10, 10, 11, 11, 12, 12],
       [11, 11, 12, 12, 13, 13, 14, 14],
       [12, 12, 13, 13, 14, 14, 15, 15]], dtype=uint8)
>>>
>>> cv.resize(b, (8,8), interpolation=cv.INTER_NEAREST)  # right!!
array([[ 0,  0,  1,  1,  2,  2,  3,  3],
       [ 0,  0,  1,  1,  2,  2,  3,  3],
       [ 4,  4,  5,  5,  6,  6,  7,  7],
       [ 4,  4,  5,  5,  6,  6,  7,  7],
       [ 8,  8,  9,  9, 10, 10, 11, 11],
       [ 8,  8,  9,  9, 10, 10, 11, 11],
       [12, 12, 13, 13, 14, 14, 15, 15],
       [12, 12, 13, 13, 14, 14, 15, 15]], dtype=uint8)
这是opencv的一个interpolation选项。
Bit exact nearest neighbor interpolation. This will produce same results as the nearest neighbor method in PIL, scikit-image or Matlab.
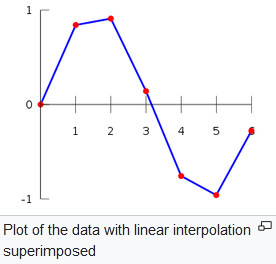
线性插值法,在两个点x和y中间插值,中间的点z的值,由这两个边上的点x和y的值,用线性计算的方式得到,z更靠近谁,计算式中它的值的权重就越大。
所谓Bi-Linear,双线性,就是在二维平面上考虑问题。会有三种使用线性插值法的情况:
一维的线性插值法如下图:
下图展示了双线性插值法的过程,已知4个相邻像素点,当前采样的纹理坐标在这四个点内,则首先根据x方向的纹理坐标进行线性插值,然后根据y方向的纹理坐标再进行一遍线性插值:
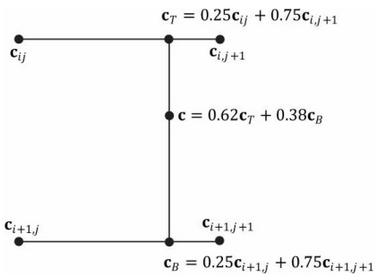
需要注意:各种库提供的算法,实现上都有一些差异,比如如何确定边缘点的权重,哪些点用原始值等等。
1D linear,计算需要2个点的数据;2D linear,计算需要4个点的数据。
opencv还有INTER_LINEAR_EXACT这个选项。
Bit exact bilinear interpolation
INTER_LINEAR_EXACT is a modification of INTER_LINEAR and both uses bilinear interpolation algorithm. The only difference is that the calculations in INTER_LINEAR_EXACT are accurate to a bit.
这是一张总结性质的图:
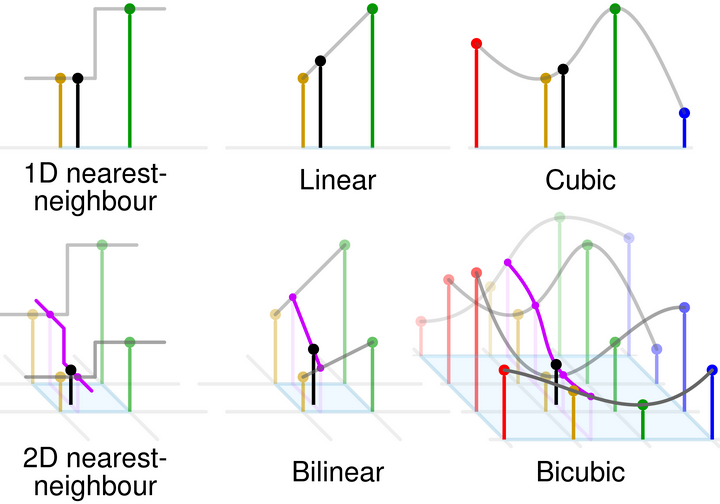
cubic interpolation就不再是线性算法了,而且它要使用16个点来计算。
In image processing, bicubic interpolation is often chosen over bilinear or nearest-neighbor interpolation in image resampling, when speed is not an issue. In contrast to bilinear interpolation, which only takes 4 pixels (2×2) into account, bicubic interpolation considers 16 pixels (4×4). Images resampled with bicubic interpolation are smoother and have fewer interpolation artifacts.
cubic interpolation算法是在求解3次方方程:
$$ f(x) = ax^3 + bx^2 + cx +d $$
已知4个点,能够列出4个方程,可以求出每个方程中的abcd。求出4组abcd后,带入一个x,得到4个y,然后再来最后算一次cubic方程,这就是bicubic了。
当要计算的点在边缘的时候,边缘需要某种padding,来满足计算需要。
在计算cubic方程的时候,x可以一直重复假设取0,1,2,3,或者-1,0,1,2(与算法2相同)
先学习 Spline Interpolation 这个概念:
spline是个有趣的词,下面这段来自wiki:
In the mathematical field of numerical analysis, spline interpolation is a form of interpolation where the interpolant is a special type of piecewise polynomial called a spline.
That is, instead of fitting a single, high-degree polynomial to all of the values at once, spline interpolation fits low-degree polynomials to small subsets of the values, for example, fitting nine cubic polynomials between each of the pairs of ten points, instead of fitting a single degree-ten polynomial to all of them.
Spline interpolation is often preferred over polynomial interpolation because the interpolation error can be made small even when using low-degree polynomials for the spline. Spline interpolation also avoids the problem of Runge's phenomenon, in which oscillation can occur between points when interpolating using high-degree polynomials.
上面这段文字中提到的
polynomail interpolation,就是算法1的思路。
算法思路:
假设取x = -1,0,1,2,可以得到如下等式:
$$ f(0) = d $$
$$ f(1) = a + b + c + d $$
$$ f'(x) = 3ax^2 + 2bx + c $$
因此:
$$ f'(0) = c $$
$$ f'(1) = 3a + 2b + c $$
如何得到以上4个没有x的等式的值:
Interpolation is often used to interpolate between a list of values. In that case we don't know the derivative of the function. We could simply use derivative 0 at every point, but we obtain smoother curves when we use the slope of a line between the previous and the next point as the derivative at a point. In that case the resulting polynomial is called a Catmull-Rom spline. Suppose you have the values y0, y1, y2 and y3 at respectively x=-1, x=0, x=1, and x=2. Then we can assign the values of f(0), f(1), f'(0) and f'(1) using the formulas below to interpolate between p1 and p2.
4个y值是知道的,因此:
$$ f(0) = y1 $$
$$ f(1) = y2 $$
$$ f'(0) = \frac{y2-y0}{2} $$
$$ f'(1) = \frac{y3-y1}{2} $$
这样一组abcd就解出来了:
$$ a = -{1\over2}y0+{3\over2}y1-{3\over2}y2+{1\over2}y3 $$
$$ b = y0-{5\over2}y1+2y2-{1\over2}y3 $$
$$ c = -{1\over2}y0 + {1\over2}y2 $$
$$ d = y1 $$
关于边缘的padding:
The first and the last interval
We used the two points left of the interval and the two points right of the inverval as inputs for the interpolation function. But what if we want to interpolate between the first two or last two elements of a list? Then we have no p0 or no p3. The solution is to imagine an extra point at each end of the list. In other words, we have to make up a value for p0 and p3 when interpolating the leftmost and rightmost interval respectively. Two ways to do this are:
Left: p0 = p1
Right: p3 = p2
Left: p0 = 2p1 - p2
Right: p3 = 2p2 - p1
网上都这么说:使用INTER_AREA放大图片时,效果像NEAREST,但不是完全一样;主要使用此方法来缩小图像。
when the image is zoomed, it is similar to the INTER_NEAREST method.
简单说,这个算法就寻找缩小后的图像的每个像素的原始区域(在原图中),将原始区域中的像素值均值化。
如果原始区域包含部分像素的一部分,即不是一个整数像素值,那些只有一部分在原始区域的像素,按在原始区域内的面积大小,计算权重。比如某个像素整个都在原始区域内,权重就是1/area,否则权重就是会更小,如0.3/area。
我们来看一个AREA与LINEAR计算的区别:
>>> b = np.arange(25,dtype=np.float32).reshape(5,5)
>>> b
array([[ 0.,  1.,  2.,  3.,  4.],
       [ 5.,  6.,  7.,  8.,  9.],
       [10., 11., 12., 13., 14.],
       [15., 16., 17., 18., 19.],
       [20., 21., 22., 23., 24.]], dtype=float32)
>>> cv.resize(b, (2,2))
array([[ 4.5,  7. ],
       [17. , 19.5]], dtype=float32)
>>> cv.resize(b, (2,2), interpolation=cv.INTER_AREA)
array([[ 4.8,  7.2],
       [16.8, 19.2]], dtype=float32)
Lanczos interpolation over 8x8 neighborhood.
兰索斯插值,暂时不懂......
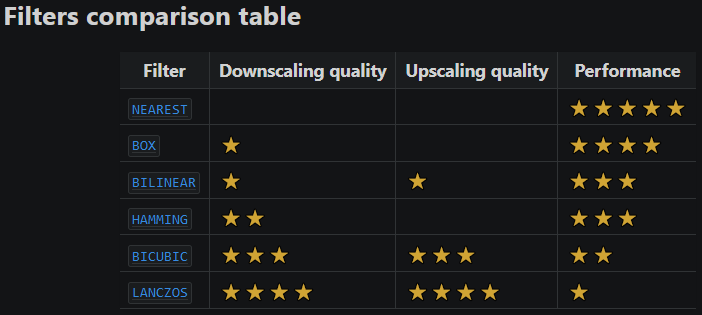
pillow库中有这两个算法,不过可以忽略了:
DeprecationWarning: BOX is deprecated and will be removed in Pillow 10 (2023-07-01). Use Resampling.BOX instead.
DeprecationWarning: HAMMING is deprecated and will be removed in Pillow 10 (2023-07-01). Use Resampling.HAMMING instead.
这个表格来自pillow官方文档,不一定能够跟opencv一致,供参考:
Deep Learning for Image Super-resolution: A Survey
https://arxiv.org/pdf/1902.06068v2.pdf
本文链接:https://cs.pynote.net/ag/image/202204201/
-- EOF --
-- MORE --