Last Updated: 2023-07-24 09:57:31 Monday
-- TOC --
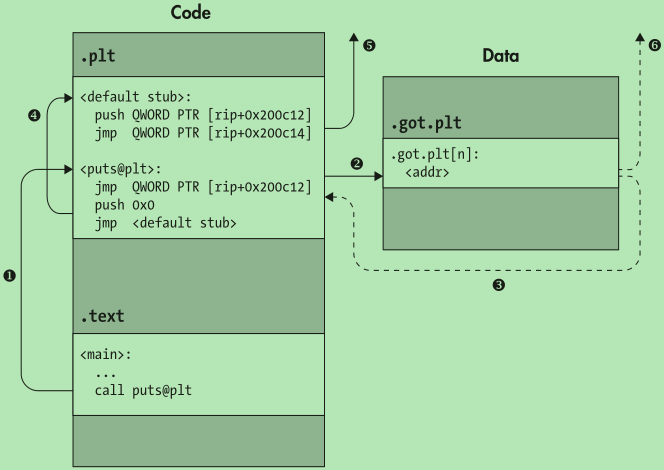
动态链接的场景,库中代码对自己定义的全局变量的访问,直接通过.got表,动态链接器在加载模块的时候,会修改.got表中的内容,.got表所在内存可读可写,每个进程有个副本。而外部函数接口的访问,稍微复杂一点点。代码也是通过.got.plt获得外部接口的地址,但这个地址默认并不是在加载的时候获得,而是第一次调用的时候,通过.plt中的代码获得,这叫做延迟绑定,即Lazy Binding。
如果在加载模块的时候,就去解析外部接口的地址,这会增加程序启动的时间。而且,有一些外部接口,可能在整个程序的运行期间,都不会被用到,加载时解析这些地址,还浪费了时间。Lazy Binding机制将解析确定这些外部符号的时机,延迟到了第一次调用的时刻,在第一次调用时解析地址,更新.got.plt。只要解析一次,后面的调用就不再重复解析,直接从.plt到.got.plt。
如果是实时进程,可能就需要绕过Lazy Binding机制,此时设置LD_BIND_NOW=1环境变量。
两个术语:
GOT: Global Offset TablePLT:Procedure Linkage Table本文通过一段简单的代码,来详细分析PLT和Lazy Binding机制。
#include <stdio.h>
#include <stdlib.h>

int main() {
    int a = 42;
    printf("%d\n", a);
    char *p = malloc(79);
    free(p);
    return 0;
}
这段代码调用了3个libc.so.6中的接口,编译链接后,看看反汇编:
$ gcc -g test.c -o test
$ objdump -S -M intel --disassemble=main test
0000000000401146 <main>:
#include <stdio.h>
#include <stdlib.h>


int main() {
  401146:       55                      push   rbp
  401147:       48 89 e5                mov    rbp,rsp
  40114a:       48 83 ec 10             sub    rsp,0x10
    int a = 42;
  40114e:       c7 45 fc 2a 00 00 00    mov    DWORD PTR [rbp-0x4],0x2a
    printf("%d\n", a);
  401155:       8b 45 fc                mov    eax,DWORD PTR [rbp-0x4]
  401158:       89 c6                   mov    esi,eax
  40115a:       bf 10 20 40 00          mov    edi,0x402010
  40115f:       b8 00 00 00 00          mov    eax,0x0
  401164:       e8 d7 fe ff ff          call   401040 <printf@plt>
    char *p = malloc(79);
  401169:       bf 4f 00 00 00          mov    edi,0x4f
  40116e:       e8 dd fe ff ff          call   401050 <malloc@plt>
  401173:       48 89 45 f0             mov    QWORD PTR [rbp-0x10],rax
    free(p);
  401177:       48 8b 45 f0             mov    rax,QWORD PTR [rbp-0x10]
  40117b:       48 89 c7                mov    rdi,rax
  40117e:       e8 ad fe ff ff          call   401030 <free@plt>
    return 0;
  401183:       b8 00 00 00 00          mov    eax,0x0
}
  401188:       c9                      leave
  401189:       c3                      ret
链接后的代码,3个对libc的调用,是<printf@plt>,<malloc@plt>和<free@plt>。名称说明了这3个函数接口,是在plt区域。plt区是一小段精妙的代码,用来在运行时动态解析接口的地址,每个外部函数接口,都有一个独立的plt区代码。
$ objdump -M intel -d -j .plt test

test:     file format elf64-x86-64


Disassembly of section .plt:

0000000000401020 <free@plt-0x10>:
  401020:       ff 35 e2 2f 00 00       push   QWORD PTR [rip+0x2fe2]        # 404008 <_GLOBAL_OFFSET_TABLE_+0x8>
  401026:       ff 25 e4 2f 00 00       jmp    QWORD PTR [rip+0x2fe4]        # 404010 <_GLOBAL_OFFSET_TABLE_+0x10>
  40102c:       0f 1f 40 00             nop    DWORD PTR [rax+0x0]

0000000000401030 <free@plt>:
  401030:       ff 25 e2 2f 00 00       jmp    QWORD PTR [rip+0x2fe2]        # 404018 <free@GLIBC_2.2.5>
  401036:       68 00 00 00 00          push   0x0
  40103b:       e9 e0 ff ff ff          jmp    401020 <_init+0x20>

0000000000401040 <printf@plt>:
  401040:       ff 25 da 2f 00 00       jmp    QWORD PTR [rip+0x2fda]        # 404020 <printf@GLIBC_2.2.5>
  401046:       68 01 00 00 00          push   0x1
  40104b:       e9 d0 ff ff ff          jmp    401020 <_init+0x20>

0000000000401050 <malloc@plt>:
  401050:       ff 25 d2 2f 00 00       jmp    QWORD PTR [rip+0x2fd2]        # 404028 <malloc@GLIBC_2.2.5>
  401056:       68 02 00 00 00          push   0x2
  40105b:       e9 c0 ff ff ff          jmp    401020 <_init+0x20>
xxx@plt首先就是jmp到4040xx这段地址,这段地址,属于.got.plt:
$ readelf -S test
...
 [23] .got.plt          PROGBITS         0000000000404000  00003000
       0000000000000030  0000000000000008  WA       0     0     8
...
现在来看看这3个跳转地址的内容是啥:
$ readelf -x23 test

Hex dump of section '.got.plt':
 NOTE: This section has relocations against it, but these have NOT been applied to this dump.
  0x00404000 203e4000 00000000 00000000 00000000  >@.............
  0x00404010 00000000 00000000 36104000 00000000 ........6.@.....
  0x00404020 46104000 00000000 56104000 00000000 F.@.....V.@.....
由于是Intel的little endian芯片,3个跳转地址对应的值为:
0x404018: 0x00401036
0x404020: 0x00401046
0x404028: 0x00401056
而对应的这3个地址,刚好就是jmp语句的下一条地址!程序加载后,对外部接口的第1次调用,就是这么绕了一下,然后就回到了xxx@plt的第2条语句,push。
  401036:       68 00 00 00 00          push   0x0  # <free@plt>
  401046:       68 01 00 00 00          push   0x1  # <printf@plt>
  401056:       68 02 00 00 00          push   0x2  # <malloc@plt>
push指令的这3个数字是什么?他们是.rela.plt重定位表的index:
$ readelf -r test
...
Relocation section '.rela.plt' at offset 0x538 contains 3 entries:
  Offset          Info           Type           Sym. Value    Sym. Name + Addend
000000404018  000100000007 R_X86_64_JUMP_SLO 0000000000000000 free@GLIBC_2.2.5 + 0
000000404020  000300000007 R_X86_64_JUMP_SLO 0000000000000000 printf@GLIBC_2.2.5 + 0
000000404028  000500000007 R_X86_64_JUMP_SLO 0000000000000000 malloc@GLIBC_2.2.5 + 0
push完index,jmp到.plt section最开始的位置。此时,是第2个push,内容地址为0x404008,反汇编已经给出了提示,是.got.plt偏移8bytes这个位置,上文已经给出了这个section的内容,在没运行起来的时候,这个地址的值是全0,同时下一条jmp指令的地址也是全0。(运行时这两处的全0会被填上值)
做了2次push,然后jmp!
.got.plt里的内容,只剩下最开头的8bytes还未涉及,我们来看一下。这8bytes的值为0x403e20,看起来很像某个section的地址。是的,它是程序.dynamic section的地址:
 [21] .dynamic          DYNAMIC          0000000000403e20  00002e20
       00000000000001d0  0000000000000010  WA       7     0     8
至此,.got.plt的内容如下:
0: address of .dynamic section
8: 0
16:0
24:<free@plt>的第2条指令
32:<printf@plt>的第2条指令
40:<malloc@plt>的第2条指令
现在,是时候运行起来看看了。
$ gdb -q test
Reading symbols from test...
(gdb) b main
Breakpoint 1 at 0x40114e: file test.c, line 6.
(gdb) r
Starting program: /home/xinlin/test/test

This GDB supports auto-downloading debuginfo from the following URLs:
https://debuginfod.fedoraproject.org/
Enable debuginfod for this session? (y or [n])
Debuginfod has been disabled.
To make this setting permanent, add 'set debuginfod enabled off' to .gdbinit.
[Thread debugging using libthread_db enabled]
Using host libthread_db library "/lib64/libthread_db.so.1".

Breakpoint 1, main () at test.c:6
6           int a = 42;
Missing separate debuginfos, use: dnf debuginfo-install glibc-2.35-22.fc36.x86_64
(gdb) x /6xg 0x404000
0x404000:       0x0000000000403e20      0x00007ffff7ffe2a0
0x404010:       0x00007ffff7fdaa30      0x0000000000401036
0x404020 <printf@got.plt>:      0x0000000000401046      0x0000000000401056
此时,.got.plt中的值如上。代码停在main入口,3个libc中的接口还未调用过,因此他们现在在.got.plt中的地址,还都是xxx@plt的第2条指令地址。但第2个push的值和那个jmp地址已经有了:
(gdb) x /g 0x00007ffff7ffe2a0
0x7ffff7ffe2a0: 0x0000000000000000
(gdb) x /i 0x00007ffff7fdaa30
   0x7ffff7fdaa30 <_dl_runtime_resolve_xsave>:  endbr64
第2个push的值,用于表示当前进程,为啥是0?(动态链接库在内存中,只有一份copy,但被多个进程共享,因此动态链接器在解析地址的时候,需要知道是为哪个进程做解析,不同进程用不同虚拟地址映射同一个接口)
随后的那个jmp地址,是动态链接器解析地址接口的入口。当代码第1次调用某个外部接口的时候,会走到这个动态解析地址的接口,这个接口通过两个push传递参数(与Linux ABI不同),然后找到接口在进程虚拟地址空间中的地址,修改.got.plt内容,下次在调用此接口,就不用这么麻烦了。
(gdb) bt
#0  main () at test.c:6
(gdb) n
7           printf("%d\n", a);
(gdb) n
42
8           char *p = malloc(79);
(gdb) x /6xg 0x404000
0x404000:       0x0000000000403e20      0x00007ffff7ffe2a0
0x404010:       0x00007ffff7fdaa30      0x0000000000401036
0x404020 <printf@got.plt>:      0x00007ffff7c5a950      0x0000000000401056
(gdb) n
9           free(p);
(gdb) x /6xg 0x404000
0x404000:       0x0000000000403e20      0x00007ffff7ffe2a0
0x404010:       0x00007ffff7fdaa30      0x0000000000401036
0x404020 <printf@got.plt>:      0x00007ffff7c5a950      0x00007ffff7c9cb00
(gdb) n
10          return 0;
(gdb) x /6xg 0x404000
0x404000:       0x0000000000403e20      0x00007ffff7ffe2a0
0x404010:       0x00007ffff7fdaa30      0x00007ffff7c9d0c0
0x404020 <printf@got.plt>:      0x00007ffff7c5a950      0x00007ffff7c9cb00
到此,.got.plt的内容就功德圆满了!
动态链接程序的执行顺序
OS判断此程序是动态链接的,加载程序自身,加载动态链接器。首先执行动态链接器,将程序依赖的模块,以及模块依赖的模块,都load进程序的虚拟地址空间(如果这些模块已经在内存,比如libc,就直接做虚拟地址映射即可)。然后,再将PC指针指向程序入口。
可执行程序的动态链接器信息,包含在程序代码内部,在.interp section中:
$ readelf -p1 test

String dump of section '.interp':
  [     0]  /lib64/ld-linux-x86-64.so.2
动态链接器如何得知程序依赖的模块
这就是.dynamic section里面提供的信息:
$ readelf -d test

Dynamic section at offset 0x2e20 contains 24 entries:
  Tag        Type                         Name/Value
 0x0000000000000001 (NEEDED)             Shared library: [libc.so.6]
 0x000000000000000c (INIT)               0x401000
 0x000000000000000d (FINI)               0x40118c
 0x0000000000000019 (INIT_ARRAY)         0x403e10
 0x000000000000001b (INIT_ARRAYSZ)       8 (bytes)
 0x000000000000001a (FINI_ARRAY)         0x403e18
 0x000000000000001c (FINI_ARRAYSZ)       8 (bytes)
 0x000000006ffffef5 (GNU_HASH)           0x4003c0
 0x0000000000000005 (STRTAB)             0x400470
 0x0000000000000006 (SYMTAB)             0x4003e0
 0x000000000000000a (STRSZ)              86 (bytes)
 0x000000000000000b (SYMENT)             24 (bytes)
 0x0000000000000015 (DEBUG)              0x0
 0x0000000000000003 (PLTGOT)             0x404000
 0x0000000000000002 (PLTRELSZ)           72 (bytes)
 0x0000000000000014 (PLTREL)             RELA
 0x0000000000000017 (JMPREL)             0x400538
 0x0000000000000007 (RELA)               0x400508
 0x0000000000000008 (RELASZ)             48 (bytes)
 0x0000000000000009 (RELAENT)            24 (bytes)
 0x000000006ffffffe (VERNEED)            0x4004d8
 0x000000006fffffff (VERNEEDNUM)         1
 0x000000006ffffff0 (VERSYM)             0x4004c6
 0x0000000000000000 (NULL)               0x0
ldd命令也可以用来查看程序依赖的模块。
为什么要通过GOT?
这个问题其实是,为什么不直接修改代码中的地址,而是修改GOT中的地址?
因为.text不可写!而.got可写。
另一个原因是,某个动态链接库也可能会依赖其它动态链接库,由于每个动态链接库在内存中只有一份copy,被所有依赖的进程共享,直接修改库中代码地址是不可行的,每个进程的虚拟地址都不同。但修改.got可以,因为.got属于数据区,每个进程都有独立的副本!
本文链接:https://cs.pynote.net/sf/c/cdm/202302212/
-- EOF --
-- MORE --